TipsMake.com- In Windows 7, Microsoft has added many features to help users work more efficiently and have higher performance than working with previous versions of Windows. However, you still have to spend some effort to learn some of them. If your daily work is to support an increasing number of Windows 7 users, read through 7 tips to help them work faster and complete faster.Or, use them to effectively upgrade your own Windows 7 use.
1.Quick access with Jump Lists
Jump Lists is one of Windows' extremely effective secret weapons.With previous versions of Windows, the Start Menu displays a list of recently used files that help users access them with just one click.However, this list only links to a certain file type, and it only displays the 10 most recently used files, quickly moving the items from the list.
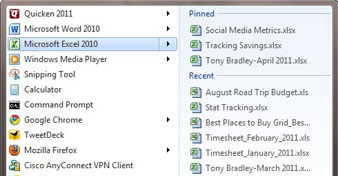
Jump List displays the most recently used files of many applications in Start Menu.
The Jump Lists feature in Windows 7 applies the Recent Items concept-and applies it to any application to give you quick access, with just one click of the newly used file.nearest use.A small arrow to the right of the application name in Start Menu is the presence of a Jump List.Users can move the mouse over the application to expand the Jump List and see a list of the most recently used files by that application; Click on the file you want to open it immediately.
The number of items kept in each Jump List by default is 10, but you can extend it to 60 in the Start Menu settings: Right-click the Windows taskbar and select Properties ; then click on the Start Menu tab in the Properties window; Next select Customize button.At the bottom of the Start Menu customization area, you can choose the number of items displayed in the Jump List.No matter how you install it, it will be the setting for all Jump Lists.There is no way to customize it for a single application.
More importantly, you can pin items to Jump List, so there is no need to worry about them being rotated from the list anymore.For example, if there is a file that is frequently accessed, you can click the pushpin icon next to the file name whenever you hover over it in the Jump List to pin it to a fixed list.Pinned files will appear above the Jump List and are not removed.To remove a news item from the Jump List, select it in the list, click the pushpin icon and select " Unpin from this list ".
Jump Lists are not only available in Start Menu; they also appear when you right-click an application's icon in Windows 7's taskbar.In addition to the list of the latest or recently used pinned files that appear in that application's Start Menu Jump List, You will see some other tasks, such as "Pin this program to taskbar".
2.Increase the power of the context menu
You must be familiar with the concept of menu context.If you right-click on the Windows 7 desktop or in an application, a menu of options will appear with differences in context-what application you are clicking and what you are doing.
Menu context helps you work faster in Windows 7 by providing quick access to some key functions.However, by pressing the Shift key when you click, you can access an expanded list of options, allowing you to work more efficiently.For example, if you right-click and hold down the Shift key on a file or folder, one of the options will appear as "Copy as path", which helps copy the address book path into the file or folder storage area, wallet.like " C: UsersTonyDocuments ".
Below are the expanded options when you access with the right mouse button and click the Shift key:
The options have been expanded by the context menu in Windows 7
Context Option to add Desktop Open command window Here FileRun as different user
Copy đường dẫn
Folder Open in new processOpen in new window
Open command window here
Sao chép tập tin hoặc Folder as "Send To" submenu
Hiển thị danh sách mở rộng các chọn để gửi một mục nhập vào, chứa Downloads, My Music, My Pictures and My Videos Taskbar Jump List
Displays classic right-click context menu that includes Restore, Move, Size, Maximize, Minimize and Close commands
3.Activate AHCI
Note: This tip involves editing the Windows Registry, which is not recommended on a company computer unless you know it is permitted in the IT department's terms. Besides, remember to always back up the Registry before changing it. To get more information about backing up and restoring the registry, read the article Backup and restore the registry in Windows 7 and Vista.
Windows 7 supports AHCI (Advanced Host Controller Interface), an Intel standard capable of accelerating hard drive performance and enabling more efficient multi-tasking.If your computer has AHCI enabled when installing Windows 7, the AHCI driver will be installed by default.However, if AHCI is not enabled in the BIOS when installing, enabling it in the BIOS will then cause the system to fail, unusable.
.png)
Check Windows 7 Device Manager to see if AHCI is enabled.
To find out if AHCI is activated on your Windows 7 computer, access Device Manager (click Start-> Control Panel-> System and Security-> System-> Device Manager), expand The section is named IDE ATA/ATAPI Controllers and looks for an entry called Standard AHCI 1.0 Serial ATA Controller.If it's not there, you'll have to enable AHCI in Windows 7 before activating it in the BIOS.
Here's how:
1.Click the Start button .
2.Type " regedit " in the Search section then press Enter to start Registry Editor.
3.Then you will get a UAC appear asking, " Do you want to allow the following program to make changes to this computer? " Click Continue.
4.Navigate through the Registry to arrive
HKEY_LOCAL_MACHINESystemCurrentControlSetServicesMsahci.
5.In the right panel, select Start.
6.From the top of the menu bar, select Edit-> Modify.
7.In the Value data box, enter 0 (count 0) and click OK.
8.After completing the changes, close the Registry Editor again.
.png)
Users can use Registry Editor to enable AHCI in Windows 7.
Now, when AHCI is activated in Windows 7, you can safely activate it in the BIOS.
1.Restart the computer and select the BIOS configuration to enable AHCI support in the BIOS.The process of configuring the BIOS differs between systems but usually press F2 or the Del button during system boot; The key to press is usually displayed in the original Splash screen.
2.Look at the BIOS configuration to find AHCI and activate it.Some systems allow you to set it automatically, and the system will automatically activate or remove AHCI if it detects an operating system that supports it.
3.Save the settings and exit BIOS configuration (usually press F10).The system will then restart.
Once Windows 7 restarts, it will automatically install the necessary AHCI driver and automatically restart it again to complete the process.Now, your hard drive has been accelerated.
4.Explore Windows Aero interface
Windows 7's Aero interface includes a set of features to help you work more efficiently.
For new users, a feature called Aero Peek makes navigating through software open much faster, especially when you have multiple windows of an application open at the same time, wallet as many browser windows in Internet Explorer.Users just need to move the mouse over an application's icon in the taskbar to see thumbnails of all the windows of this application, and click the window you want to display it.This way is faster than reading through a list or using Alt-tab through a series of windows.
.png)
Scrolling through the items in the taskbar will display a thumbnail of the currently open window of a program.
Want to see through a pile of windows being opened on the screen? Aero Peek can also help: Move the cursor over the small rectangular button to the right of the taskbar to disappear all windows, making them temporarily hidden and only the borders are display-or click the button to instantly minimize the windows.Another handy feature is Aero Shake, which minimizes all windows except the one you are using: Just click and hold the title bar of this window and hover over.Redoing this process will help show all windows again.
Aero Snap is a very handy feature, especially when you have a large computer screen.If you drag a window to the left or right of the screen, it will immediately get into this position, automatically resizing to half of the screen.This is really helpful when you are doing a study: Instead of having to scroll multiple times between windows, you can drag the browser window to the left of the screen and drag the data window.Word to the right to see them simultaneously.Snap also allows you to drag a window to the top of the screen to maximize the size of the window.
5.Sort files with libraries
Windows has provided a very logical way of organizing files by providing Documents, Music, Pictures, and Videos folders and providing the right kind of content to match its folder by default.However, this storage system is inappropriate or confusing.For example, you can work on a project that uses multiple file types, or files and folders that do not match the default Windows folders.
Or, you may need to work with files stored in many different locations, such as on the first hard drive of a computer, an external USB drive and an online file sharing server.Tracking and managing files every time is a difficult task-you'll have to navigate to many different locations via Explorer or maintain unnecessary copies of the same file.
Windows 7 made a big jump in file management when introducing virtual libraries (virtual libraries).At first glance, the Libray system looks very similar to the old folder systems-there's the default Library for Documents, Music, Pictures and Videos-but it's much more comprehensive because these libraries are not restricted.by the current location of files and folders.
For example, if some data is stored in the Documents folder and other data is stored in a folder on the system file server, you can add these folders to the Documents library so that you can view and access them together.a place.The files are still in their original location; Users only take them through a single library if you want.
To add a folder to a Library, open the Library , then click the link next to the word ' Includes ' at the top of the display.In the following window, you can add or remove folders in this library.
Users can also create completely new custom libraries.Working on a big project? Create the Projects library with the subfolders inside and then add the folders and files you need to it.Working with large projects is much more efficient if you can access everything you need in a library.
To create a new library, right-click on Libraries in the left pane of Windows Explorer and select New-> Library.Name this library, open it and click the "Include a folder" button to add content.
.png)
However, users cannot add a network folder to the library unless the contents of that folder have been indexed.
Note: For a file to be added to the library, the files inside it must be indexed by Windows 7.This is done automatically with all the files and folders inside the computer.If a network folder has been indexed on its storage device, you can add it to the library.If it is still not indexed, you can assign it an index by right-clicking on the file/folder and selecting " Always available offline ".Once you've been indexed for offline access, you can add it to your library.
6.Take advantage of shortcut keys
Navigating through the Windows 7 graphical interface with the mouse is something we often do.However, when you're very busy typing the keyboard, it will be very inconvenient to take your hand off the movie table to the mouse and vice versa.Fortunately, Windows has a shortcut set to help you work more efficiently.
Sure, we are all familiar with the key combination Ctrl + C to copy and Ctr + V to paste the copied paragraph.However, there are still hundreds of other shortcut keys that have been grouped by category.Here are some of the most handy shortcuts we found when working in Windows 7:
Utility shortcuts in Windows 7
Combining Windows Action key + T Focus on the taskbar and move through the software on it every time you press the Windows key combination + Ctrl + [number] Move the application at some N position on the taskbar service.For example, to view the 3rd application on the taskbar from the left, press Windows-Ctrl-3 Windows + Alt + [number] Display Jump List for the Nth application on the Windows taskbar + Shift + [number ] Open a new pinned application window to the N-position taskbar Windows + left/right arrow Move the position of the current window to the left or right of the Windows screen + up arrow Maximize the current Windows window + down arrow Minimize the current window Windows + B Move the mouse pointer to the item showing hidden icons on the taskbarInitially, learning a group of these shortcuts seems to be more difficult than switching between mice and keyboards-you are not familiar with them and they require a sense of thought and effort to learn.However, if you use them more, you will get more efficiency and the performance of tasks without clicking will become the second instinct.
7.Search in Windows
The last utility in Windows 7 is the search item in the Start Menu.Although this function is nothing new in Windows 7, it has been significantly upgraded compared to previous versions.This makes it much more powerful when searching for software, files, emails or any other file on your computer.Users simply click Start, type what you want in the Search section and get the results found.
The search feature will display results immediately when you enter keywords, sort by file type-program, data, email, Control Panel,.When you see the results you want, click on it to open.

评论